Redax Computer Academy
No. 1 Helping Blog

MS- OFFICE WORD 2003 Create Labels - How To Create Lables?

September 27, 2019

Create Labels Microsoft Word 2003 FULL EXPLAIN 

Mailing Label

हम MS Word के अन्दर Form Letter की तरह ही Mailing labels का निर्माण कर सकते है | Word हमे विशेष Mailing Labels जैसे A very ,HP, Macro आदि के निर्माण की सुविधा प्रदान करता है |

How to Create Mailing Labels

Labels का निर्माण करने के लिए निम्नलिखित Steps को Follow करते है-
Step 1 -: सबसे पहले New Document Cerate करते है,फिर Tools Menu में से Mail Merge Option को सेलेक्ट करते है, जिससे Mail Merge Dialog box प्रदर्शित होगा |
Tools Menu→ Letter and Mailings →Mail MergeRelated image
Step 2 -: Create पर click करते है, Drop Down list में से Mailing Labels का चयन करते है |
Image result for mailing labels in ms word 2003
Step 3 -: Word में हमें Query Window मिलेगी जिसमे हमसे Mailing Labels को Active Window में बनाने को पूछा जाएगा या एक नई Window में? हम Active Window का चयन करते है |
Step 4 -: Mailing Label का निर्माण करने से पहले हम एक file का निर्माण या Specify करना होगा,क्योकि हमें Data Mailing Labels का निर्माण करने के लिए इसमें से Fields का इस्तेमाल करना होगा | हमें Mail Merge Helper फिर से दिखाई देगा –और उसके ऊपर का Prompt यह इंगित कर रहा होगा की अगला कदम या Step Data source का चयन करना होगा,तब Get Data पर Click करते है तथा Drop Down list से create Data Source का चयन करते है|
Step 5 -:यदि हम Create Data Source का चयन करते है,तो Data Source का निर्माण “Merging Mailing List with from letter”में बताये गए तरीके के अनुसार करते है | जब हम रिकार्ड्स को जोड़ना तय कर चुके तो OK पर click करते है | हम खाली Mailing Label Main Form पर लौट आएगे तथा Mail Merge Tool Bar भी दिखता रहेगा |मैलिंग लेबल का निर्माण करने के के लिए Mail Merge Helper button पर क्लिक करते है |Mail Merger helper डायलॉग बॉक्स प्रदर्शित हो जाएगा | Setup का चयन करते है |Label option Dialog box दिखाई देगा |
Step 6 -: विकल्प के रूप में यदि हम Open Data Source का चुनाव करते है तो Open Data Source को चुनने के बाद आपको Main Document को Setup करना चाहिए | जब हम इसoption का चुनाव करेगे,तो हमको Label Option Dialog box दिखाई देगा |
Step 7-: Correct Label Products का चुनाव करके उपयोग होने वाले Labels का चुनाव करे |फिर चुने हुए Labels के लिए product Number को चुनते है |
Step 8 -: OK button पर click करते है, create Labels डायलॉग बॉक्स शो हो जायगा |
Step 9 -: Merge File को Labels में इनपुट करने के लिएInsert Merge का चयन करते है | यदि जरुरी हो तो Spaces, Punctuation and lines को जोड़े |
Step 10 -:अपनी पसंद की Files का चयन करने के बाद OK पर Click करते है ,तो हम Mail Merge Helper Dialog box पर आ जायगे |
Step 11 -: Merge को संचालित करने के लिए Merge को Choose करते है,तो Merge Dialog Box Show हो जायगा |
Step 12 -:अपनी आवश्यकतानुसार Merge option को सेट करते है, फिर Merge को Choose करते है | Word Mailing Labels and Mailing List को Merge कर देगा तथा परिणाम को New Document, Pointer आदि पर भेज देगा |
MS- OFFICE WORD 2003 Create Labels - How To Create Lables? MS- OFFICE WORD 2003 Create Labels - How To Create Lables? Reviewed by REDAX on September 27, 2019 Rating: 5

MS- OFFICE WORD 2007 Create Envelop - HOW TO CREAT ENVELOP

September 27, 2019

Create Envelop Microsoft Word 2007 FULL EXPLAIN 

हम अपने लैटर के लिए बनाए गए Data Source का प्रयोग करके Envelop तथा Labels भी बना सकते है तथा Print कर सकते है| Envelops को प्रिंट करने के लिए निम्न स्टेप्स का अनुसरण (Follow)करते है –
Image result for how to create envelope in ms word 2007

Step 1- Create Group में जाएं 
Step 2- Create Option का चयन करते है तथा इसके पश्चात Envelop Option का चयन करते है|
Step 3- Delivery Address  का चयन करते है|
Step 4- इसके पश्चात  Return Address  का चयन करते है |
Step 5- अपने Envelopes के लिए Option पर Click कर Envelop के Page का चयन करते है|
Step 6-  इसके पश्चात Envelop Dialog Box में से Envelop के लिए ऑप्शन को सेट करते है |
Step 7- अंत में Add to Document पर Click करते है ,इसके पश्चात Envelop Address Dialog Box प्रदर्शित होगा |
Step 8यदि हम Main Document में कार्य रहे है तो Envelop Create करने के लिए Insert Merge Field Box में से Merge Field Option का चयन करते है |
Step 9Post Net Bar Code Insert करने के लिए Insert Postal Bar Code Option का चयन करते है |
Step 10- इसके पश्चात OK Button पर क्लिक करते है |
Step 11- अब Tools Menu में से Mail Merge Option का चयन करे |
Step 12- Mail Merge Helper Screen प्रदर्शित होगी,इसमें से Field को Insert करने के पश्चात् मर्ज ऑप्शन का चयन करते है |
MS- OFFICE WORD 2007 Create Envelop - HOW TO CREAT ENVELOP MS- OFFICE WORD 2007 Create Envelop -  HOW TO CREAT ENVELOP Reviewed by REDAX on September 27, 2019 Rating: 5

MS- OFFICE WORD 2007 MAILING TAB

September 27, 2019

MAILING MENU Microsoft Word 2007 FULL EXPLAIN 

Mailings Tab का उपयोग करना

इस Lesson में हम आपको MS Word की Mailings Tab के बारे में बताएंगे. MS Word की Mailings Tab को आप Keyboard से Alt+M दबाकर सक्रिय् कर सकते हैं. या आप इसे Mouse द्वारा भी इस्तेमाल कर सकते हैं। 
MS OFFICE WORD 2007 MAILING TAB
Mailings Tab को कई Group में बांटा गया हैं. प्रत्येक Group में एक कार्य विशेष से संबंधित Commands होती हैं. आप इन Commands को माऊस के द्वारा इस्तेमाल कर सकते हैं. नीचे हम आपको बताएंगे कि Mailings Tab में कितने Group होते हैं? और प्रत्येक Group में उपलब्ध Commands का क्या कार्य हैं?

Mailings Tab के Group के नाम और उनके कार्य

Mailings Tab में कुल 5 Group होते है. इन्हे आप ऊपर दिखाए गए Screen Shot में देख सकते है. इन Groups का नाम क्रमश: CreateWrite and Insert FieldsReview Results, और Finish है. अब आप mailings Tab के Groups से तो परिचित हो गए है. आइए अब प्रत्येक Group के कार्य को जानते है.
Note: Mailings Tab का एक ही मुख्य कार्य है. एक साथ कई लोगों को Mail, Envelope, Label आदि अलग-अलग भेजना. इस कार्य के लिए हमे MS Word में Mail Merge करना पडता हैं. और इस टैब में मौजूद प्रत्येक Group एक दूसरे पर निर्भर हैं. इसलिए इनका अलल-अलग अध्ययन करना आसान नही हैं. फिर भी हमने आपको समझाने के लिए एक कोशिश की हैं. ताकि आपको Mailings Tab की आधारभूत जानकारी हो जाए

1. Create

इस Group द्वारा आप डॉक्युमेंट में Envelopes और Lables बना सकते हैं. जैसे, Mailing Address Labels, File Folder Labels आदि।

2. Start Mail Merge

इस Group द्वारा Mail Merge की Process शुरु होती हैं. और आप यहँ से जिनको मेल भेजना चाहते हैं. उन्हें जोड सकते हैं. यानि Recipients List Create, Edit, Delete कर सकते हैं।

3. Write & Insert Fields

जब आप ऊपर के दोनों Group का काम खत्म कर लेते हैं। तब इस Group का काम आता है. नही तो आप इस Group को अलग से इस्तेमाल नही कर सकते हैं. क्योंकि इसकी Commands Active नही होती हैं. इस Group द्वारा आप अपने Mail में Extra Fields Insert कर सकते हैं, किसी विशेष Mailing Address को ब्लॉक कर सकते हैं. और Greeting Line जोड सकते हैं. और आप ये सभी कार्य प्रत्येक Recipient के लिए अलग-अलग कर सकते हैं।

4. Preview Results

जब आपकी Mail Merge का कार्य पूरा हो जाता हैं, तो इस Group में मौजूद Commands के जरीए आप अपने कार्य का Preview देख सकते हैं।

5. Finish

इस Group द्वारा आप Mail Merge प्रक्रिया को खत्म करते हैं।

MS- OFFICE WORD 2007 MAILING TAB MS- OFFICE WORD 2007 MAILING TAB Reviewed by REDAX on September 27, 2019 Rating: 5

MS- OFFICE WORD 2007 REFERENCE MENU FULL EXPLAIN IN HINDI

September 15, 2019

REFERENCE MENU Microsoft Word 2007 FULL EXPLAIN 

 संदर्भ Microsoft Word 2007 के पर टैब  नए रिबन की सहायता से अपना दस्तावेज़ स्रोतों, प्रशंसा पत्र ए पी ए, विधायक आदि की तरह एक शैली संदर्भ टैब पर आप विषय-सूची, फुटनोट, उद्धरण और संदर्भ सूची, टेबल तरह बातें मिलेगा दर्ज करें और चयन करने के लिए प्रदान करता है आंकड़े, कैप्शन, इंडेक्स और टेबल अधिकारियों की की।
हमें क्या पर एक नज़र डालते हैं  संदर्भ टैब  है पेशकश करने के लिए। यहाँ कि यह दिखता का एक स्क्रीन शॉट है।
word_references_tab
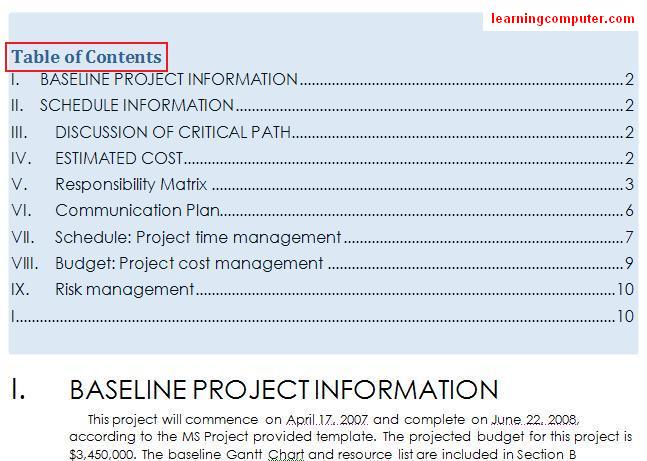
माइक्रोसॉफ्ट वर्ड 2007 में, सामग्री की एक तालिका बनाने वास्तव में आसान है। एक बात आप सुनिश्चित करने की आवश्यकता है कि आप आइटम विषय-सूची में शामिल किए जाने की जरूरत है कि की ओर बढ़ शैलियों में से एक का उपयोग कर अपने दस्तावेज़ टाइप है।

मुझे उदाहरण के द्वारा आप इस दिखा। मेरी परियोजना प्रबंधन योजना रिपोर्ट के लिए, मैं शीर्षक के साथ नौ विभिन्न वर्गों बनाया है। हालांकि मैं सिर्फ अभी तक विषय-सूची बनाने का अवसर नहीं पड़ा है। मुझे लगता है कि आगे क्या होगा। विषय-सूची पर क्लिक करें संदर्भ टैब के अंतर्गत सामग्री समूह की तालिका में आदेश है, तो ड्रॉप डाउन बटन पर क्लिक करें। यह आप विकल्पों में से निर्मित मेनू से चुनने के लिए दे देंगे। उस सूची से, स्वचालित तालिका 2 चुनें।
word_references_tab1
जैसा कि नीचे दिखाया के बाद मैं उपर्युक्त चरणों के माध्यम से चला गया, Microsoft Word 2007 सामग्री का एक अच्छा तालिका उत्पन्न। अब जब आप किसी विशिष्ट अनुभाग ब्राउज़ करने के लिए की जरूरत है, तुम सब करने की जरूरत है Ctrl + विषय-सूची में खंड क्लिक करें और इसे तुम वहाँ ले जाएगा है।

word_references_tab1b
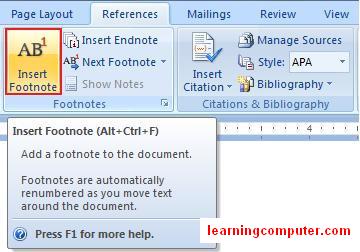
फुटनोट और एंडनोट पूरक जानकारी आम तौर पर एक पृष्ठ के अंत में स्थित में अपने दस्तावेज़ की पाठक को निर्देशित करने के लिए एक आसान तरीका है। आप संदर्भ टैब में फुटनोट समूह का उपयोग फुटनोट और एंडनोट सम्मिलित कर सकते हैं। यह नीचे बताया गया है।

word_references_tab2
मान लीजिए कि मैं डाव प्रोजेक्ट योजना रिपोर्ट, एक अनुमान के अनुसार पूरा होने की तारीख की तर्ज पर कुछ पर मेरे अनुसूची जानकारी में एक फुटनोट जोड़ना चाहते हैं। मैं के बाद खंड बी मेरी सम्मिलन बिंदु और सही चयन करें और फिर फ़ुटनोट सम्मिलित करें क्लिक करें। पद एक 1 जोड़ देगा और उसके बाद पृष्ठ के अंत करने के लिए कर्सर ले जाने के। मैं तो मेरे आवश्यक पाठ सम्मिलित करें और है कि यह है, हम सिर्फ हमारे पृष्ठ पर एक फुटनोट डाला है।

स्क्रीन शॉट इस समझा जाएगा, छोटे लाल आयत मेरी सम्मिलन बिंदु है और बड़े लाल आयत वास्तविक फुटनोट पाठ है।
word_references_tab2b
अपने दस्तावेज़ किसी और के काम होते हैं, यह आम तौर पर संदर्भ के लिए उद्धृत किया जाना चाहिए। पाठकों इस तरह के संदर्भ को सक्षम जोड़ा जा रहा है स्रोत की जानकारी की पहचान। Microsoft Word 2007 का उपयोग करना, आप आसानी से अपने समाचार पत्र में उद्धरण और संदर्भ सम्मिलित कर सकते हैं। हमें इस प्रक्रिया को अगले में शामिल चरणों की समीक्षा करें।

पहली बात करने की ज़रूरत है अपने संदर्भ फ़ॉर्मेट करने के लिए एक मानक शैली का चयन है। आप ड्रॉप डाउन पर क्लिक करते हैं वर्ड 2007 में उद्धरण और संदर्भ सूची समूह पर शैली कमांड का चयन करके ऐसा कर सकते हैं, आप उपलब्ध शैलियों की एक सूची मिल जाएगा।
के रूप में स्क्रीन के नीचे गोली मार दी द्वारा दिखाए गए हम अपने प्रशंसा पत्र के लिए ए पी ए का चयन करेंगे।
word_references_tab3
हम जोखिम प्रबंधन योजना क्षेत्र के लिए प्रशंसा पत्र जोड़ेंगे। स्क्रीन में सूचना के ऊपर गोली मार दी, मैं बोल्ड में उद्धृत पाठ जोड़ लिया है। मैं भी प्रशस्ति पत्र स्थान लाल ने संकेत दिया जोड़ लिया है। आगे बढ़ो और उद्धरण सम्मिलित करें आदेश चयन करें और फिर चुनें नए स्रोत जोड़ें।

यहां है कि यह कैसा लग रहा है।
word_references_tab3a
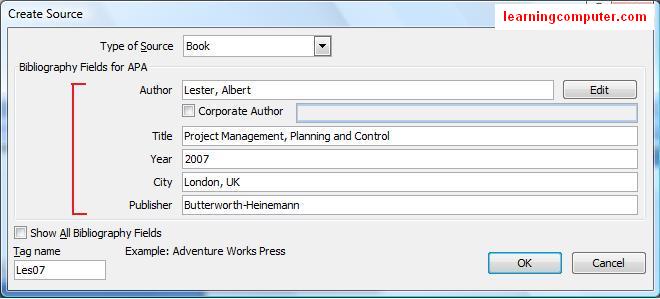
Microsoft Word 2007 का शुभारंभ करेंगे स्रोत संवाद बॉक्स बनाएं जिन्हें आप नीचे देख। यहीं पर आपको अपने प्रशस्ति पत्र के बारे में सभी जानकारी दर्ज करने की आवश्यकता नहीं है। आप देख सकते हैं, मैं प्रस्ताव, शीर्षक, प्रकाशक आदि सहित प्रासंगिक जानकारी दर्ज किया है अंत में मैं संवाद बॉक्स को बंद करने के लिए ठीक मारा।

word_references_tab3b
यह एक इनलाइन प्रशस्ति पत्र सही बोली के बगल में जोड़ देगा और यह भी हमारी रिपोर्ट में ग्रंथ सूची के संदर्भ जोड़ें। नीचे स्क्रीन कैप्चर में सूचना, अब हम प्रकाशित पुस्तक के वर्ष के अलावा लेखक का नाम देखते हैं।

word_references_tab3c
अगला जब मैं एक और उद्धरण सम्मिलित और उद्धरण सम्मिलित करें आदेश का चयन करने के लिए प्रयास करें, ध्यान दें कि पहले उद्धरण पहले से सूची में शामिल है। मैं के रूप में बोल्ड नीचे दिखाया गया में प्रकाश डाला एक अलग बोली के लिए फिर से इस एक का उपयोग कर सकते हैं।db
word_references_tab3d
मैं भी प्रबंधित सूत्रों का कहना है आदेश पर क्लिक करके मेरे सभी स्रोतों की समीक्षा करने और उद्धरण और संदर्भ सूची समूह में जा सकते हैं। तुम्हें पता है, स्रोतों की सूची का आयोजन विभिन्न फिल्टर से उन्हें सॉर्ट और यदि आप चाहें तो उन्हें संशोधित कर सकते हैं।

यहाँ स्रोत प्रबंधक का एक स्क्रीन शॉट है।
word_references_tab3e
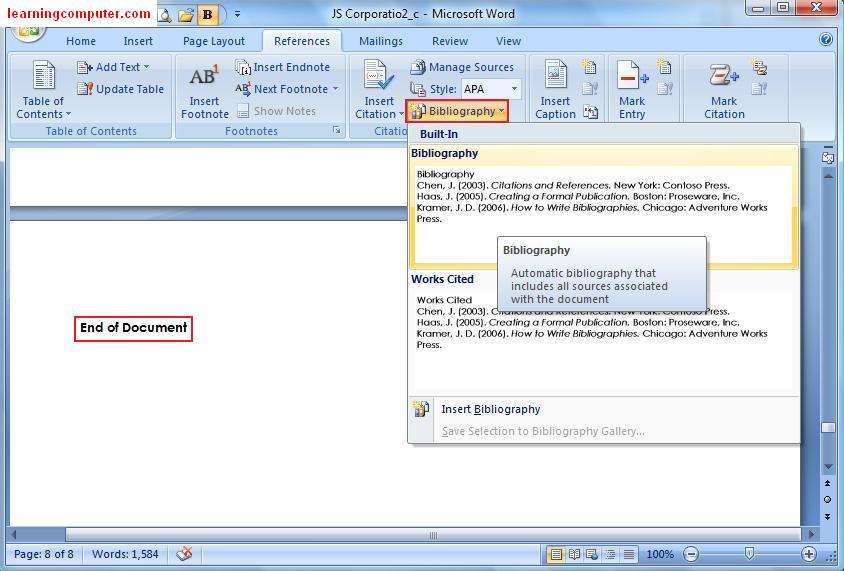
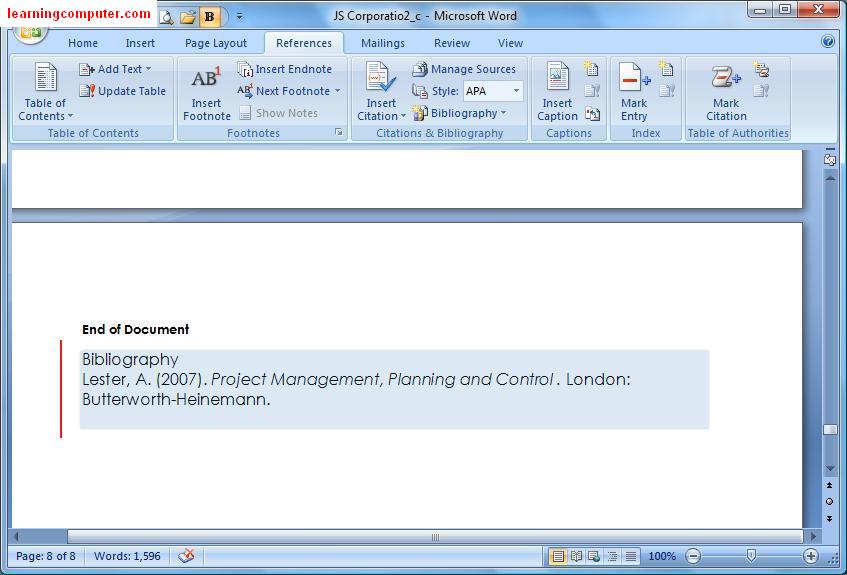
अंत में मैं इस बिंदु पर क्या करने की जरूरत मेरी दस्तावेज़ के अंत में ग्रंथ सूची जोड़ना है। मुझे बताएंगे कि कैसे करने के लिए करते हैं। आप दस्तावेज़ के अंत पर ब्राउज़ करें और सम्मिलन बिंदु चुन सकते हैं। इसके बाद आप ग्रंथ सूची आदेश का चयन करने के रूप में नीचे दिखाया गया है की जरूरत है। आप ड्रॉप डाउन से निर्मित विकल्पों में से एक का चयन करना होगा। यहाँ हम ग्रंथ सूची चुन रहे हैं।

word_references_tab3f
यह आगे जाना है और शैली आपके द्वारा चुने गए के अनुसार अपने दस्तावेज़ में एक अच्छा ग्रंथ सूची अनुभाग जोड़ देगा। हम नीचे आकृति में हमारी रिपोर्ट में ग्रंथ सूची अनुभाग से पता चला है। ध्यान दें कि यह स्वरूपण और जिस क्रम में विभिन्न वस्तुओं दिखाई देनी चाहिए, बहुत शांत वास्तव में का ध्यान रखा!

word_references_tab3g
अपनी रिपोर्ट में यह चित्र या आंकड़े का एक बहुत है, यह उस में आंकड़े की एक टेबल के लिए फायदेमंद हो सकता है। आप बस एक शीर्षक है जो वास्तव में अंतर्निहित वस्तु के लिए सूचक है डालने से ऐसा कर सकते हैं। मेरे परियोजना योजना कम से कम दो आंकड़े कि मैं आंकड़े की एक टेबल का हिस्सा बनने के लिए करना चाहते हैं नहीं है। तो मुझे लगता है कि कैसे करते हो?

मैं अपनी पहली आंकड़ा चयन करें और फिर माइक्रोसॉफ्ट शब्द 2007 यहाँ में सन्दर्भ टैब में कैप्शन समूह में सम्मिलित शीर्षक आदेश पर क्लिक करें के बारे में मैं क्या बात कर रहा हूँ का एक स्क्रीन शॉट है।
word_references_tab4
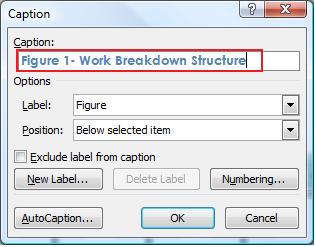
जब मैं ऊपर के चरणों को किया था, मैं कैप्शन संवाद बॉक्स मिल गया। मैं आगे चला गया और यह आंकड़ा एक के लिए कुछ और शाब्दिक जानकारी में प्रवेश किया। इस मामले में मैं इसे एक कार्य टूटने संरचना (WBS) जो एक परियोजना प्रबंधन शब्द है बोल रहा हूँ।

यह नीचे दिखाया गया है।
word_references_tab4b
मैं अपने प्रोजेक्ट योजना रिपोर्ट, एक संचार योजना और एक गैंट चार्ट में अगले दो आंकड़े के लिए उपरोक्त चरण दोहराएं। बाद मैंने किया है, मैं के आंकड़े कैप्शन समूह पर आदेश तालिका सम्मिलित करें पर क्लिक करें।

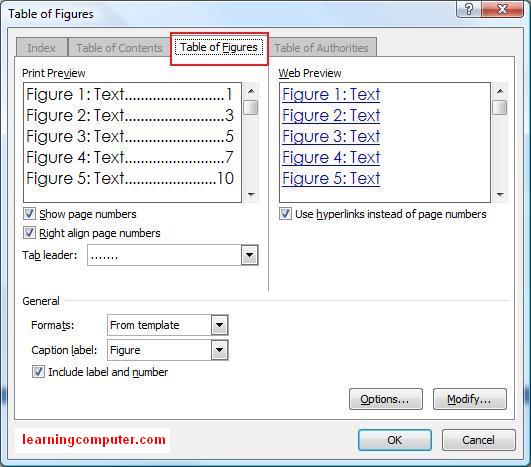
जैसा कि नीचे दिखाया इस आंकड़े संवाद बॉक्स के टेबल की शुरूआत। मैं डिफ़ॉल्ट सेटिंग छोड़ और ठीक क्लिक करने के लिए जा रहा हूँ।
word_references_tab4c
यह मेरा परियोजना की योजना बनाई रिपोर्ट में आंकड़े अनुभाग का एक पेशेवर लग रही तालिका उत्पन्न। आंकड़ों की तालिका के भीतर से, मैं बस आंकड़ा चयन कर सकते हैं और फिर Ctrl + लक्ष्य वस्तु के लिए लिंक का पालन करने के लिए क्लिक करें है।

मैं आपकी समीक्षा के लिए एक स्क्रीन पर कब्जा शामिल किया है।
word_references_tab4d
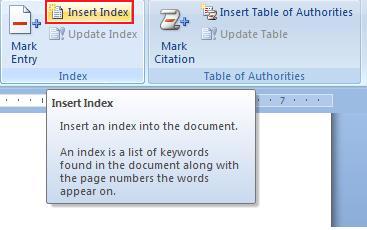
तुम भी एक सूचकांक संदर्भ टैब का उपयोग करके बना सकते हैं। सूचकांक पृष्ठों है कि वे कर रहे हैं के साथ अपने दस्तावेज़ में विषयों की सूची में शामिल हैं। आप नाम लिखने के लिए है और आप अपने सूचकांक के लिए संदर्भ पार करते हैं। हम आपको बताएंगे कि कैसे एक सूचकांक सम्मिलित करने के लिए स्क्रीन कैप्चर शामिल किया है।

word_references_tab5
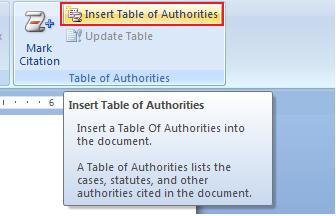
अंत में आप सभी मामलों में, विधियों और अपने दस्तावेज़ में अधिकारियों की एक सूची बना सकते हैं। आप अधिकारियों की एक मेज डालने से ऐसा कर सकते हैं। यहाँ कि यह दिखता का एक स्क्रीन शॉट है।

word_references_tab6

MS- OFFICE WORD 2007 REFERENCE MENU FULL EXPLAIN IN HINDI MS- OFFICE WORD 2007 REFERENCE MENU FULL EXPLAIN IN HINDI Reviewed by REDAX on September 15, 2019 Rating: 5

MS -OFFICE WORD 2007 REFERENCE TAB IN ENGLISH

September 15, 2019

References Tab Microsoft Word 2007 

The References Tab on Microsoft Word 2007’s new ribbon offers a quick way to enter your document sources, citations and choose a style like APA, MLA etc. On the References tab you will find things like Table of Contents, Footnotes, Citations & Bibliography, Table of Figures, Captions, Indexes and Table of Authorities.
Let us take a look at what the References Tab has to offer. Here is a screen shot of what it looks like.
word_references_tab
In Microsoft Word 2007, creating a Table of Contents is really easy. One thing you need to make sure is that you type your document using one of the heading styles for the items that need to be included in the Table of Contents.

Let me show you this by example. For my project management plan report, I have created nine different sections with Headings. However I have not had the chance to create the Table of Contents just yet.  I will do that next.  Click on the Table of Contents command in Table of Contents group under the References tab, then click on the drop down button.  It will give you built-in menu of options to choose from. From that list, choose automatic table 2.
word_references_tab1
After I went through the above mentioned steps, Microsoft Word 2007 generated a nice Table of Contents as shown below. Now when you need to browse to a specific section, all you need to do is Ctrl + click the section in Table of Contents and it will take you there directly.

word_references_tab1b
Footnotes and endnotes are an easy way to direct the reader of your document to supplemental information generally located at the end of a page. You can insert the Footnotes and endnotes using the Footnotes group in the References Tab. This is illustrated below.

word_references_tab2
Let’s say I want to add a footnote in my schedule information on Daw project plan report, something along the lines of an estimated completion date. I select my insertion point and right after section B and then click Insert Footnote. Word will add a 1 and then move the cursor to the end of the page. I then insert my necessary text and that’s it, we just inserted a footnote to our page.

The screen shot will explain this, the small red rectangle is my insertion point and the large red rectangle has the actual footnote text.
word_references_tab2b
When your document contains someone else’s work, this typically needs to be cited for reference. Adding such references enables the readers to identify the source information.  Using Microsoft word 2007, you can easily insert citations and references in your paper.  Let us review the steps involved in this process next.

The first thing you need to do is select a standard style for formatting your references.  You can do this by selecting the style command on the Citations and Bibliography group in Word 2007.  When you click on the drop down, you will get a list of available styles.
We will choose APA for our citations as shown by the screen shot below.
word_references_tab3
We will be adding citations to the Risk Management Plan area.  Notice in the screen shot above, I have added the quoted text in bold.  I have also added the citation location indicated by red.  Go ahead and select Insert Citation command and then choose add new source.

Here is what it looks like.
word_references_tab3a
Microsoft word 2007 will launch the Create Source dialog box as shown below.  This is where you will need to enter all the information regarding your citation.  As you can see, I have entered the pertinent information including offer, title, publisher etc.  Finally I hit OK to close the dialog box.

word_references_tab3b
This will add an inline citation right next to the quote and also add the reference to the bibliography in our report.  Notice in the screen capture below, we now see the author’s name in addition to the year of the published book.

word_references_tab3c
Next when I try to insert another citation and select the insert citation command, notice that the first citation is already included in the list.  I can use this one again for a separate quote as highlighted in bold shown below.


word_references_tab3d
I can also review all my sources by clicking on the Manage Sources command and go in the Citations and Bibliography group.  You can organize the list of sources, sort them by different filters and modify them if you like.

Here is a screen shot of the Source Manager.
word_references_tab3e
The last thing I need to do at this point is to add the bibliography at the end of my document.  Let me show you how to do that.  You can browse to the end of the document and select the insertion point.  Next you need to select bibliography command as shown below.  You will need to select one of the built-in choices from the drop down. Here we are selecting Bibliography.

word_references_tab3f
This will go ahead and add a nice bibliography section to your document according to the style you picked.  We have shown the bibliography section from our report in the figure below.  Notice that it took care of formatting and the order in which the different items should appear, very cool indeed!

word_references_tab3g
If your report has a lot of pictures or figures in it, it may be beneficial to have a Table of Figures in it. You can do this by simply inserting a caption which really is a pointer to the underlying object. My Project plan has at least two figures that I would like to be part of a Table of Figures. So how do I do that?

I select my first figure and then click on Insert caption command in the Captions group in the References Tab in Microsoft word 2007. Here is a screen shot of what I’m talking about.
word_references_tab4
When I did the above steps, I got the Caption dialog box. I went ahead and entered some more textual information for figure one. In this case I am calling it a Work Breakdown Structure (WBS) which is a project management term.

This is shown below.
word_references_tab4b
I repeat the above steps for the next two figures in my project plan report, a Communications Plan and a Gantt chart. After I am done, I click on Insert Table of Figures command on Captions group.

This launches the Table of Figures dialog box as shown below. I am going to leave the default settings and click Ok.
word_references_tab4c
This generated a professional looking Table of Figures section in my project planned report.  From within the table of figures, I can simply choose the figure and then do Ctrl + Click to follow the link to the target object.

I have included a screen capture for your review.
word_references_tab4d
You can also create an index using the Reference Tab.  The index includes list of topics in your document along with the pages that they are on.  You have to write the name and cross reference for your index.  We have included a screen capture to show you how to insert an index.

word_references_tab5
Finally you can make a list of all the cases, statutes and authorities in your document.  You can do this by inserting a table of authorities.  Here is a screen shot of what it looks like.

word_references_tab6
This concludes the lesson on References Tab in Microsoft Word 2007.
MS -OFFICE WORD 2007 REFERENCE TAB IN ENGLISH MS -OFFICE WORD 2007 REFERENCE TAB IN ENGLISH Reviewed by REDAX on September 15, 2019 Rating: 5
Powered by Blogger.